Felt Christmas Tree Pins
Look at this adorableness from The Purl Bee!!! I may just make a few they are so cute! :)

Here's how to make them yourself!
Materials Needed:

To make 16 (or more) Christmas Tree Pins:
■One Holiday Felt Bundle
■Valdani embroidery thread in reds, greens, and whites
■Stuffing
■A piece of scrap paper (a brown paper bag works great)
Special equiptment:
■Pinking Shears
Making the Templates:
To make your tree template cut a triangle with a 1½-inch base and 2-inch sides out of the scrap paper.
For the stump template cut a rectangle that is ½ wide by ¾-inch tall.
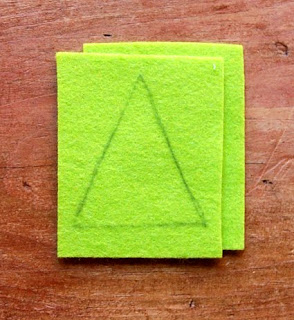
Cut two 2-inch by 2 ½-inch pieces from a non-brown piece of felt and place them on top of one another.
Trace the tree template on the top piece.

Using your pinking shears cut neatly around the traced tree shape through both layers of felt.

You will now have two identical tree shapes. Flip them over so the pencil makings are on the back.
Also cut out one stump from the brown felt using your stump template.
Sewing and Stuffing:

Pin the stump piece in between the two tree pieces in the middle of the short bottom side of the tree. The stump should stick out ½-inch.
Using a contrasting color of embroidery thread stitch around the edge of the tree pieces, in the zig zag dips of the pinked edge as shown above. When you get to the bottom you will sew in the stump as you do this.
Sew all around the edge of the tree in this manner but pause when you are 1-inch from your first stitches so there is a gap for stuffing.

Take a walnut sized ball of stuffing and stuff it into the 1-inch gap. You might want to use a sharp object like a knitting needle or pencil to get all the stuffing firmly inside of the tree.
Once all the stuffing is neatly inside continue sewing around the tree’s edge until it’s totally closed. Tie a knot at the back of the piece to keep the edge stitches in place and then pull your thread out in the middle of the back of the tree shape, where you want to place your pin.
Sew on your safety pin along the pin’s stationary arm and you’ll be all done.


Comments