Posts

What I Wore Wednesday

Image
Over on Pens and Pencil Skirts, Karen and I are sharing what we wore this week. This is what I wore this past week: If you want to see what Karen wore or any of our outfit details, head on over to www.pensandpencilskirts.wordpress.com. See ya there!

Stuffed Peppers

Image
This is one of those meals that I make only on the weekends. It's a bit time consuming but totally worth it if you have the time. Ingredients: 1 lb ground turkey 1 small onion, chopped 2 garlic cloves, minced 1 small red bell pepper, chopped 5 oz mushrooms, chopped 1 Tbsp adobo con pimiente 1 Tbsp tomato paste 1 cup of cooked brown rice 1 egg 1/2 cup of parmesan cheese, grated 1 cup of marinara sauce 1 cup of shredded mozzarella cheese (optional) 6 large green bell peppers, tops cut off and seeded Directions: *Preheat oven to 375 degrees *Brown first 7 ingredients in cast iron skillet until turkey is no longer pink *Put turkey mixture in bowl & wipe skillet clean with paper towel *Mix turkey, rice, egg and parmesan cheese until combined *Stuff peppers with mixture and place in skillet *Pour marinara sauce all around peppers *Cover with foil and cook 30 minutes in an oven preheated to 375 degrees *Remove foil and cook for an additional 15 minutes ...

Homemade Shower/Bath Bombs

Image
I recently came across the idea to make homemade shower and bath bombs online. I have a teen daughter that absolutely loves to take baths and could spend a small fortune in Lush. I have tons of essential oils and it seemed easy enough to do so I gave it a try. Pictured above are all the supplies that you will need: 1 cup of baking soda 1/3 cup of water 2-3 drops of each essential oil of your choice silicon baking mold bowl to mix it in I used the following oils as we are fighting colds nonstop this winter... Directions: Measure 1 cup of baking soda in mixing bowl. Slowly add water, stirring constantly. It should stick together and form a paste. Then drop 2-3 drops each of whatever essential oils you prefer. Pour into molds. Heat for 40 minutes in a 200 degree oven. Cool for 5 minutes. They pop right out of the molds. Package them up pretty and they make great teacher gifts!

Strawberry "Brownies"

Image
These could not be any easier, any tastier and any cuter for Valentine's Day. All it takes is a box of Strawberry cake mix and a couple of ingredients. I used this cake mix: Strawberry Brownies Author: Family Savvy Serves: 10-12 Ingredients •1 box strawberry cake mix (I use Duncan Hines) •
2 eggs •
1/3 cup oil •
1 cup powdered sugar •½ -2 TB water or milk Instructions 1.Preheat oven to 350 degrees. 2.Line 8" square baking pan with parchment (and spray with Pam). 3.Mix strawberry cake mix, eggs, and oil with hand mixer until well combined. 4.Spread batter evenly into pan. 5.Bake for 15 minutes or until just set; be careful not to overcook. 6.Allow brownies to cool for 10 minutes; lift carefully from pan using ends of parchment to lift. 7.Mix powdered sugar and water until smooth. 8.Pour glaze over brownies, spreading to edges so that glaze will drip down sides. 9.Allow brownies to cool and glaze to set before cutting into squares They were a bi...

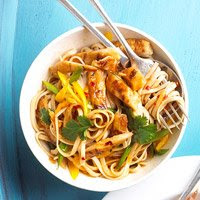
Sesame Chicken and Noodles

Image
We eat a lot of chicken in my house. So, I'm always on the hunt for new, at least to us, chicken recipes. I stumbled across this one and knew we had to try it. It's perfect for busy weeknights. Sesame Chicken and Noodles Start to Finish: 20 min. Ingredients 1/3 cup rice vinegar 1/3 cup thinly sliced green onions 2 Tbsp. honey 1 Tbsp. reduced-sodium soy sauce 1 Tbsp. grated fresh ginger 2 tsp. Asian garlic-chili sauce 2 6-oz. pkg. refrigerated grilled chicken breast strips 12 oz. dried udon noodles or whole-wheat spaghetti 3 Tbsp. toasted sesame oil 2 medium yellow, red and/or orange sweet peppers, cut in bite-size strips Fresh cilantro Directions 1. In medium bowl stir together vinegar, green onions, honey, soy sauce, ginger, and garlic-chili sauce. Add chicken; stir to coat. Set aside to allow flavors to meld. 2. Meanwhile, in large saucepan cook noodles in boiling water about 8 minutes until just tender. Dra...

Digital Project Life

Image
I am a die-hard paper crafter. I like to touch the product as I'm making things. And, that includes my scrapbook projects. However, life lately has been so busy that I cannot carve out enough time to sit down and scrap the enormous amount of photos that I take. So, a couple of months ago Becky Higgins was having a sale. Her project life app was only $.99. I decided to give it a try. Here's what I've come up so far ... With all this snow we've been having, I needed some sun in my life So, I decided to scrap some summer memories. Look how tan I was!? Then I came back to reality and scrapped some Christmas memories. Every year since my daughter was 2, she is now 14, we have cut our own Christmas tree at a farm with our friends the Nemeceks. It is my favorite part of the holiday season. Each year there is some new memory made that we talk about for years to come. The adults vowed to keep this tradition going even when the kids were out of the house. ;) He...

Snacks

Image
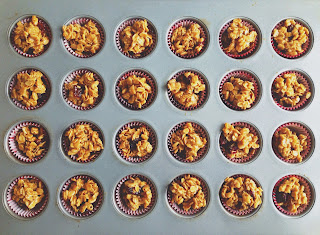
With two busy teens in the house, I'm always on the hunt for quick healthy snacks that they can just grab and go. Getting them to snack healthy and actually eat breakfast before they get on the bus is quite the struggle. So, while perusing my old magazines, I came across this quickie recipe for flourless peanut butter granola balls from A February 2011 Martha Stewart Living. Ingredients: 1 cup of rice krispies 1 cup of rolled oats (not the quick cooking variety) 1/4 cup of natural peanut butter 1/4 honey 2 TBSP of butter 1/4 cup of dried fruit Directions: -Put peanut butter, honey and butter in medium sauce pan on medium heat -Heat until smooth - about 1-2 minutes -Remove from heat -Add cereal, oats and dried fruit and mix until all combined -Put in paper lined mini cupcake tin Refrigerate for 15 minutes to set. Enjoy! Makes 24 balls.

Gluten Free Strawberry Muffins

Image
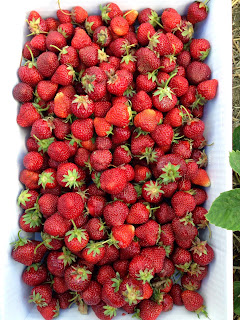
One of our favorite things to do as a family is to go pick your own fruit. June in new York means strawberries. We always like to try different farms. It mixes it up a little bit. This year we went to Ellsworth Farms in Sharon, CT. The strawberries were all picture perfect. We picked a ton of strawberries and I love figuring out different ways to use them. This year I decided to make freezer jam and strawberry muffins. Here is my recipe for gluten free strawberry muffins: (Makes 12 Muffins) 1 3/4 cups of gluten free flour (I use Bobs Red Mill) 1 tsp xantham gum 1 tsp baking soda 1/2 cup sugar 1/4 tsp nutmeg 2 eggs (at room temp) 1/2 cup skim milk 1/4 unsalted butter (melted) 1 tsp vanilla extract 1 1/2 cups of chopped fresh strawberries -Preheat oven to 375 -Place paper liners in muffin tin -Combine flour, xantham gum, sugar & baking soda in a bowl -In a separate bowl, beat eggs and add in milk, butter & vanilla -Mix Well -Combine wet and dry ...

Caprese Salad

Image
Nothing says summer to me quite like a good old caprese salad. Ripe tomatoes, Sweet basil and fresh mozzarella with a drizzle of balsamic glaze. This is all you need to make a delicious caprese salad: I love the balsamic glaze from Trader Joe's (Trader Giotto's). It is so inexpensive but doesn't sacrifice flavor for cost. The key is to have fresh ingredients. Fresh mozzarella is a must! And today most grocery stores have a really nice selection of cheeses. I usually serve this for lunch or as a Friday night appetizer. You can even make little caprese stacks. All you have to do is layer the tomato, basil and mozzarella slices on top of one another and drizzle the glaze on top. You can make a mini version of this salad too by using boccincini, cherry tomatoes and basil and put them on skewers! SO cute! I hope you make a caprese salad this summer! You wont be disappointed. Note: the tray is from Ikea

Easy Pasta Bake

Image
Are you sensing a theme here yet? I love home-cooked meals. I love trying new recipes and I have more cookbooks than I care to count. But, a lot of nights, I resort to quick tried and true recipes that are my family's favorites. My easy pasta bake is one of them. For the past year, my family has incorporated more gluten free meals into our diet. The biggest struggle has been finding a pasta that stands up in taste and texture. We have tried brown rice pasta, quinoa pasta and corn pasta and all fell short. But then Barilla came out with their own gluten free pasta and it is the best! It tastes the most like "real" pasta and it holds up really well in sauces. I used Barilla gluten free penne pasta for this recipe. Here is all that you will need to make this easy and delicious dish. Ingredients: 1-1/2 boxes of Barilla Gluten Free Penne Pasta 1.33 lb pouch of Butterball Ground Turkey 1 jar of your favorite marinara sauce (we love Rao's) 1 medium ca...

Gluten Free Chicken and Rice Casserole

Image
I find this time of the year always to be so hectic. Take the school activities, sporting events, all the last minute end of the year things that come up and add them to the regular day-to-day hustle and it sometimes leaves me no room to make dinner. This is where the make ahead casserole comes in. Our favorite is my Chicken and Rice Casserole. And bonus, it's gluten free too! I made it even easier by using several premade ingredients such as Perdue cooked and seasoned chicken, boil in bag brown rice and jarred alfredo sauce. You can most certainly grill your own chicken and made your own white sauce but when time is an issue, premade is the way to go. Ingredients: 1 package of Perdue Short Cuts Carved Chicken (Grilled Italian Style) 9 oz 1 bag of Success Boil-in-bag brown rice (cooked) 1 jar of your favorite alfredo sauce 1/2 bag of frozen peas thawed Grated Parmesan Cheese Gluten Free Bread Crumbs Slivered almonds Directions: Mix first 5 ingredients and pl...

My New Etsy Shop!!!!

Image
I opened! I finally opened!! Natsy Tatsy Designs is up and running!!!!! I've been making earrings, bracelets, gift tags, cards and all sorts of handmade things and giving them as gifts forever. With the urging of some very sweet friends, I decided to open up an etsy shop to sell my handmade creations. I am starting with earrings. I hope to have lots more items listed within the next week. So stop by and let me know what you think? Am I priced right? Do you like the colors and variety of choices so far? What would like to see more of? Whatever feedback you can give me, would be greatly appreciated!!! Here's a little preview of what's in the shop:

Pine Cone Tree Transformation

Image
I recently found myself browsing the aisles of GoodWill looking for things to alter. So, when I saw this pine cone tree for $4.99 I knew it would be perfect. I kinda loved it just the way it was but I was itching to paint it. At first I thought all white would be pretty Or maybe even red? But since I loved the way the Noel sign turned out after I spray painted it gold, I was itching to paint this gold as well. And I am glad I did. I love it. I think the gold adds a subtle elegance to it and would make a gorgeous centerpiece for my holiday table. I still may add some glitter to it. What do you think?

GoodWill Gold

Image
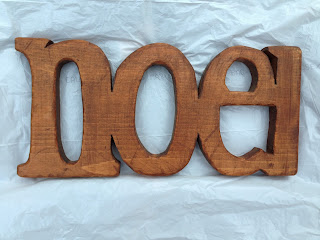
I am fortunate to have my local HomeGoods and GoodWill stores right next to each other. I always check GoodWill first in hopes of finding a hidden treasure. If I strike out, I always just head on into HomeGoods to see what they have. Lately, I've been scoring at GoodWill. Yay! On one recent trip, I found two holiday decorating treasures. A pine cone tree and this Noel sign that was only $.99! What a steal! I have been eager to try spray painting with gold metallic paint. I've seen so many crafters and bloggers using it and even though I am usually drawn to silver, I knew I had to experiment. I am so glad that I did. I can't stop. This Noel sign was is just one of the many things I've spray painted gold. I even spray painted our pumpkins gold! I'll share those projects in another post. I don't want to overwhelm you. I used Krylon spray paint in metallic gold pictured below that I bought at Hobby Lobby for 40% off. And after two coats m...

More Project Life

Image
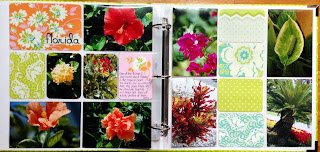
I have a great admiration for those people who do the weekly format of Project Life. I don't think I could keep it up for an entire year for a variety of reasons. 1. I don't think my life is exciting enough to take a picture everyday. 2. I would most certainly forget to take a photo everyday even if I could find something worth documenting. 3. I take the bulk of my photos at family activities. So, I just decided to make it work for me and my photos and my life. That's what's so great about Project Life. You can make it work for you. Don't misunderstand me though, I wish I was disciplined enough to take a photo a day or even do the weekly themes but I know my limitations. Maybe that can be one of my resolutions for 2014 to be better about taking a photo a day. :) Oh, I just thought of a fourth reason I could not do the weekly format. I like to jump around when I scrapbook. I need to feel in the mood to scrap a certain set of photos. Hence these two ne...

Project Life

Image
Back in the day, I used to scrapbook and forgo meals and personal hygiene. The kids were young. Their idea of a good dinner was a corndog or chicken nuggets. Hubby was always working late. I went to crops at the lss and even hosted them once a week at my house. I used to call my camera my third arm. Then something happened. I went to work as a preschool teacher. My mornings without the kiddos were now occupied. Then the afternoons got filled with baseball, soccer and scouts, etc. I found myself scrapping less and less. But I still was taking photos like crazy. That is exactly when Ms. Becky Higgins created this brilliant concept called Project Life. It's scrapping without all the fuss and muss. Its taking all your precious photos and adding gorgeous artwork and getting them into books that people can actually look at. Oh My! So, I bought the very first kit and I made a couple of pages. Then a few months go by and nothing. Now all these amazing Project Life k...