Posts

Showing posts from 2010

Jelly Bean Wreath

Image
The great thing about making a wreath is that you can make it as large or as small as you like. Just remember to have plenty of Jelly Belly® jelly beans on hand! Ingredients: 9 cupcakes, your favorite flavor, baked in green paper liners and cooled 1 1/2 cups canned vanilla frosting, divided Red and green food coloring 1/2 cup each, Kiwi, Margarita and Green Apple Jelly Belly® jelly beans 13 red Cherry Sours by Jelly Belly® 2 whole graham crackers 4 thin pretzel sticks 1/2 cup Very Cherry or Cinnamon red Jelly Belly® jelly beans Coconut Jelly Belly jelly beans Instructions: 1. Tint 1/2 cup of the vanilla frosting red with the food coloring and spoon frosting into a small resealable bag; set aside. Tint the remaining 1 cup of vanilla frosting green with the food coloring. 2. Spread the tops of the cupcakes with the green frosting. Arrange a line of Green Apple Jelly Belly jelly beans, end to end across the top of all but 1 cupcake. Arrange the Kiwi and Margarita Jelly Belly jelly beans o
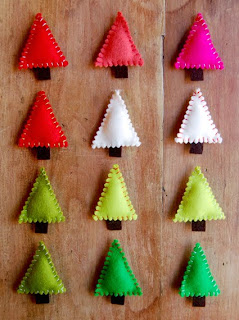
Felt Christmas Tree Pins

Image
Look at this adorableness from The Purl Bee!!! I may just make a few they are so cute! :) Here's how to make them yourself! Materials Needed: To make 16 (or more) Christmas Tree Pins: ■One Holiday Felt Bundle ■Valdani embroidery thread in reds, greens, and whites ■Stuffing ■A piece of scrap paper (a brown paper bag works great) Special equiptment: ■Pinking Shears Making the Templates: To make your tree template cut a triangle with a 1½-inch base and 2-inch sides out of the scrap paper. For the stump template cut a rectangle that is ½ wide by ¾-inch tall. Cut two 2-inch by 2 ½-inch pieces from a non-brown piece of felt and place them on top of one another. Trace the tree template on the top piece. Using your pinking shears cut neatly around the traced tree shape through both layers of felt. You will now have two identical tree shapes. Flip them over so the pencil makings are on the back. Also cut out one stump from the brown felt using your stump template. Sewing and Stuffing: P

Linky Party

Image
over at http://www.eighteen25.blogspot.com Filled with tons of fabulous ideas for Halloween and Fall. Go check it out! You won't be disappointed. I promise. :)

A Little Fall Decor Craft

Image
a la the fabulously talented Becky Higgins. This is my take on Becky Higgins' contribution to the fun month of Halloween crafts over at www.eighteen25.blogspot.com. I love that I can keep it up until December. :) Supplies: Frame - Re from Target Paper - Basic Grey Pumpkins - The Chrsitmas Tree Shop Letter Stickers - Making Memories And one more look of where it sits on my kitchen counter for now at least. TFL!

A New Blanket

Image
A new blanket for me to knit. I have only ever knit a baby blanket so this will be new things for me. I am so excited! I think it will look lovely in my family room. I'm sure the kids are going to fight over it. LOL! Pattern courtesy of The Pearl Bee. ■7 skeins of Knit Collage's Pixie Dust, a blend of Wool, Mohair and Pixie Sparkles. This color is "Lemon Meringue". ■A US #36, 32 or 40 inch circular needle. The Pattern Gauge 1 stitch = approximately 1 inch in 1 x 1 rib Finished Size Approximately 26 inches wide by 56 inches long Begin Cast on 27 stitches. Row 1: *K1, p1, repeat from * to last stitch, k1. Row 2: *P1, k1, repeat from * to last stitch, p1. Repeat Rows 1 and 2 until you have used all 7 skeins minus about 4 yards (or until piece measures 56 inches). Bind off in pattern and weave in the ends. (Little Tip: Rather than wresting this yarn through the eye of a tapestry needle, just use your hands to weave in the ends.) Doesn't it look comfy? I can

Feeling Crafty

Image
I've been itching to get crafty lately and there is no better place to get the juices flowing, at least for me, than to make a few cards with supplies I had on hand. I used mostly Anna Griffin supplies leftover from classes I used to teach at my now defunct lss. The flowers are Prima, stamp is Stampin' Up!, the brads are Junkitz and the photo corner is good ol' Heidi Swapp. TFL!

Kraft Homestyle Mac & Cheese

Image
My husband came home with 2 bags of Kraft Homestyle Mac & Cheese the other day. They were giving them away at Grand Central Station. So, while the kids and I were thinking about what to eat for lunch today, I remembered that we had these... Looks good doesn't it? It was YUM-O! And very easy to make. I am spreading the word ... go pick up a bag or two. :)

Brownie Bottom Cheesecake!

Image
So, last weekend we finally joined Costco. After years as being a faithful BJ's member, we broke down. During our first trip down the aisles, my chocoholic daughter saw this book and read the recipes to me as we were walking around. When she got to the brownie bottom cheesecake, she got my attention. Then when I saw the price of only $5.99, I threw it in the cart. That very night we made the cheesecake sans the chocolate drizzle. It was easy and delicious.I'm sure I'll be sharing many more recipes from this book. The cover of this amazing book! The recipe. :) My piece. :D The cake minus a couple of pieces. ;)

Dollar Store Get

Image
I am a dollar store junkie. I love them. I cannot pass one up. In my opinion, The Dollar Tree stores are the best. And the ones in Florida are even better than the ones we have here in NY. So, no trip to Florida would be complete without a visit to The Dollar Tree. I usually go to the one in Hallandale but this time I went to an even better one on Sheridan St in Hollywood. It was huge with tons of aisles. I was in Heaven. The dollar store is great for finding inexpensive decorations. Practically all of my Easter decorations came from The Dollar Tree in Hallandale. I have quite the assortment of ceramic eggs, candy dishes and bunnies. My second favorite season or holday to decorate for is fall. I have a thing for pumpkins. So, while I was persuing the aisles of the dollar store this July, I picked up these babies to add to my collection. I took them home in my carryon luggage. Aren't they cute?

I'm baaaaaaaaaaaack!

Image
We are back from vacation. Back to life. Back to reality. It feels like I never left and that's sad. :( Over the next few days, before school starts, I'll be catching up with everyone. I did manage to unpack, go thru the mound of mail, pay the bills and get the house restocked. I have tons of beach photos to share but first I'll share pics from my nephew's 2nd birthday party on Saturday. A good time was had by all. :) Marco and Dylan before the guests arrived. Stealing a taste. ;) Blowing out the candles with some help from his Mom. :) Enjoying some serious swing-time. The ride is much better with a dirty face. ;) Natalie, Nicole and Dylan enjoying some time in the bounce house. :) How many family members does it take to deflate a bounce house? At least 4. LOL!!! Marco opening up presents. This is the best I could do. He wouldn't look up for all the tea in China. He was too excited about ripping into his presents. :) Happy Birthday Marco!!!

Christmas in July

Image
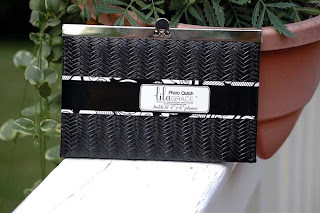
I know. I know. Christmas presents in July?? Yes, indeed. I cannot pass up a cute little gift for all the tea in China. So, while I was on the way to take Natalie to use the restroom in TJ Maxx, these adorable photo clutch wallets caught my eye. I thought to myself ... oh, wouldn't they make a cute little Christmas gift!? They were only $6.99 and I could fill them up with photos to make them extra personal. Here's what I got: One for my Mom. One for my sister. One for my Aunt Joanne. And I couldn't resist this one just for me. It matches my very favorite hot pink patent Coach bag. ;)

Key Lime Cupcakes

Image
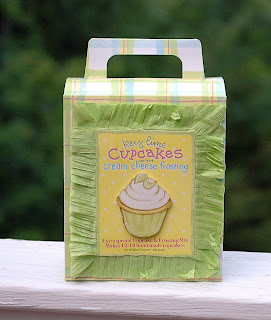
What is a girl to do when her husband calls her at 2:48 to tell her that he is bringing home a dinner guest and they will be there at 3:20!? For starters, you don't panic. Then, you thank your lucky stars that you like to frequent HomeGoods and TJ Maxx on a regular basis. And finally, you are fine with serving dessert that is semi-homemade. ;) While killing some time at HomeGoods last week, I saw a mix for Key Lime Cupcakes. I am a sucker for anything key lime and the packaging was just too cute to pass up. And at $7.00, I thought totally worth it. Well, they were. So, if you see this mix at your local HomeGoods pick it up. They were a hit with the company. :) And here they are on my new palm frond serving tray I picked up at TJ Maxx for $3.99. They were delicious. :)

It is an addiction

Image
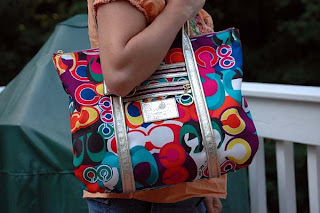
It has been passed down from mother to daughter. Shoes. Bags. Accessories. My Mom's nickname in our family is, in fact, Imelda as in Imelda Marcos. My Mom has a shoe collection that rivals hers for sure. It's just too bad that she is a size 9 and I am a 7. Because, if I like a shoe enough, I have been known to wear an 8. ;) So, on Saturday, at my cousin's graduation party, my Mom says I have something for you. I said...oh really? She said I bought myself a Coach bag and it is really not me. It's too wild. I said bring it on! Indeed it is funky but with an ensemble of solid colors, I think it adds just the perfect amount of punch. And it was free so I love it even more. And, DH says you cannot wear that when you are with me. It is hideous. I'm still trying to decide if that is a pro or a con. :O What's the verdict?

S'mores Cookies and a Little Spray Painting Project

Image
Giant S'mores Chocolate Chip cookies (recipe courtesy of www.picky-palate.com) Ingredients 2 sticks softened butter 1 Cup packed light brown sugar 3/4 Cup granulated sugar 2 large eggs 1 Tablespoon pure vanilla 4 Cups all purpose flour 1 teaspoon kosher salt 1 1/2 teaspoons baking soda 1 1/2 Cups chocolate chips 3 regular size Hershey’s Chocolate Bars 3 Full Graham Crackers 5-6 Large Marshmallows cut into fourths 1. Preheat oven to 350 degrees F. Place butter and sugars into a stand or electric mixer; beat until light and fluffy. Add eggs and vanilla until well combined. 2. Place flour, salt and baking soda into a large bowl; mix then slowly add to wet ingredients along with the chocolate chips. Mix until just combined. Scoop a heaping 1/4 Cup of cookie dough into muffin top pan cups. Press down then gently press chocolate bar squares, graham cracker pieces and marshmallow slices on top of cookie dough. Bake for 11-13 minutes or until edges are just turning brown. Let cool

HomeGoods Loot

Image
Now that school is over and I am home, I decided to spruce things up around here. I spend most of my time in the kitchen so I decided to start there. I knew a trip to HomeGoods was in order. While roaming the aisles of HomeGoods with my son, he found these adorable little appetizer plates on the cutest stand. They go perfectly with my new yellow kitchen. I had to have them. Then I found this matching spoonrest. It is part of the set so I just had to have it. And I needed one anyway since I've just been placing my dirty spoons directly on the counter. And at $3.99 it was a steal. And three cute little bowls to match. Now, I really need to bring in another color in there. I am thinking of mixing in a little orange and a little green to spice things up. What do you think?

June Bug

Image
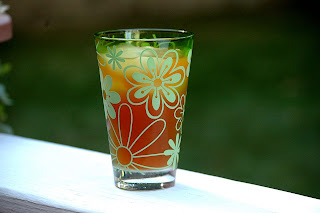
In the South, a june bug is what they call an adorably pesky child. I made this yesterday in honor of my very own little adorable pesky child who turned 10. ;) You can make it for kids too. Just omit the rum. :) Enjoy! It is most certainly delicious. 3 cups of ginger ale 4 Tbsp grenadine 4 Tbsp orange juice 3 scoops of orange sherbet 1/2 cup white rum Blend together. Pour into ice filled glasses.

One Month From Today

Image
I will be here. Sunnin' my buns. Ahhhh, life is great! Such a cute coverup. Don't ya think? It is perfect to go to breakfast in and then right to the beach. Or even to lunch right from the beach. It's from Mark. :0 I will be making this for dessert one night. LOVE me key lime anything. ;) Key Lime Poke Cake Cake 1 box Betty Crocker® SuperMoist® white cake mix 1 1/4 cups water 1 tablespoon vegetable oil 4 eggs Key Lime Filling 1 can (14 oz) sweetened condensed milk (not evaporated) 3/4 cup whipping cream 1/2 cup Key lime juice or regular lime juice 1 teaspoon grated lime peel 4 drops yellow food color 1 drop green food color Frosting 1 container (12 oz) Betty Crocker® Whipped vanilla frosting 2 teaspoons grated lime peel Garnish, If Desired Fresh strawberries Key lime slices Lemon leaves 1. Heat oven to 350°F for shiny metal or glass pan (or 325°F for dark or nonstick pan). Spray bottom only of 13x9-inch pan with baking spray with flour. 2. In large bowl, beat

3 Cheese Mostaccioli Bolognese

Image
3-Cheese Mostaccioli Bolognese From: Campbell's Kitchen Prep: 30 minutes Bake: 20 minutes Serves: 6 If you're looking for a baked ziti recipe that's better than the rest, try this one...it gets unique and delicious flavor from sliced zucchini, and the blend of three cheeses makes it even better. Ingredients: 1 pound ground beef 2 cloves garlic, minced 1 medium zucchini, cut in half lengthwise and sliced (about 1 cup) 3 cups Prego® Traditional Italian Sauce or Organic Tomato & Basil Italian Sauce 6 cups mostaccioli or tube-shaped pasta (ziti), cooked and drained 6 ounces shredded mozzarella cheese (about 1 1/2 cups) 1 cup ricotta cheese 1/4 cup grated Parmesan cheese Directions: Heat the oven to 400°F. Cook the beef and garlic in a 12-inch skillet over medium-high heat until the beef is well browned, stirring often to break up the meat. Pour off any fat. Add the zucchini and cook until it's tender. Stir in the sauce. Stir the beef mixture, pasta, 1/2 cup mozzarella